Showing posts with label crochet tips. Show all posts

Saturday, February 21, 2009

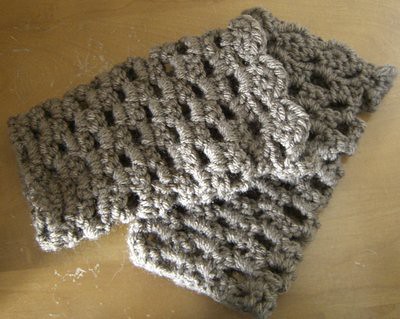
Openwork Fingerless Gloves in Taupe


I've been working through crochet patterns like an addict, and trying to keep up with the documentation!

One of the first patterns that I ever set my sights on was written by Creativeyarn, Crochet Openwork Handwarmers.

After another raid of my Mother's stash, I found two skeins of Vanna's Choice yarn in the correct weight in the colour, Taupe. I immediately snapped it up and went to work.

The first glove turned out rather well. I used a 4.00mm hook as suggested, but ran into a couple of problems. First of all, it felt a little snug, but I would have lived with it, assuming that it would stretch out, if not for the thumb hole. The hook size with my tension simply didn't leave a large enough opening, so the material was sitting off of my hand and pinching.

The other snag was the scalloped edging. The directions simply state:

Ch1, *5hdc in second dc of next dc group, sc in next space*. This gets repeated all the way around.

Having recently perused a pattern for yet another fingerless glove (I'm tireless, I know) recently, and had my Mother show me the beginning step, a double crochet foundation chain, I interpreted the directions in a similar manner.

I completed the hdc in the second dc, and then the next hdc in that one, and so on. While this "worked," it was difficult and inconsistent. I couldn't figure out how to insert the hook each time, so I just kind of forced it into wherever.

For the next two, I sat down with a book that I've borrowed from my local library and flipped through to the Shell or Fan stitch, wondering if this could be applied. Once I read it over, I knew it would do the trick. You make each stitch in the same stitch (in this case, the "second dc of the next dc group"), and then commonly pin it down on the other side with a single crochet. It ends up resembling the type of silk printed fan that I used to play with at my Granny's house as a child.

It worked beautifully! I also went up one full hook size, because I don't own a 4.50mm hook. They are quite roomy, and would fit someone more snugly with a larger hand size than I. Still, this will allow me to slip it over my watch and Medic Alert bracelet with ease. I could also slip it over a long-sleeved t-shirt and have the colour show through, rather than pushing up the sleeves.

I also have a keen idea of how to change the size of the glove to suit the wearer. For a pre-teen, I would use a 4.00mm hook. For an average sized, not overweight person, I'd use a 4.50mm, and for anyone larger, the 5.00mm hook.

As for the misfit glove, I plan on sewing the bottom end and lacing some ribbon around the top underneath the scalloped edging. If I need to add handles, I will. I haven't worked out all of the design details yet, but it will be a pouch or purse of some kind.

Sunday, February 15, 2009

Fingerless Gloves: Second Time is a Charm!


Forget the third time, I beat the Fingerless blues on the second try. Here is how I achieved success:
  1. I spent forever getting the foundation chain to actually be as wide as the measurements in the pattern dictated, without having to add stitches. Well, I did this on the second glove. The first one is a little homelier. (Okay, okay, so maybe third time IS the charm)
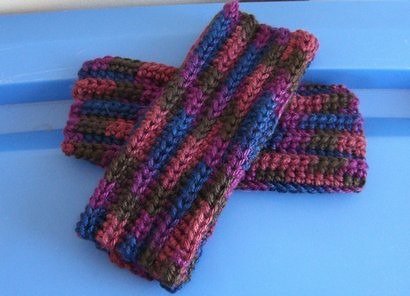
  2. I chose a thinner yarn. I still didn't want to work with the mohair, and am having fun pulling out of my stash. This was completed using Bernat Satin Ombres, and the colour, as best I can tell, is "Tapestry." In my opinion, that's sort of like saying "sofa" is a colour, but I'll run with it.
  3. I used the correct hook size. I know this sounds obvious, but I hadn't been able to get the foundation chain to the length that I wanted on my first and failed attempt, so I had gone up several hook sizes.
  4. When sewing up the seams, I left an extra half inch for the thumb hole.

Monday, January 19, 2009

Tips for Starting a Project


I have to say that so far, starting up a crochet project has been the most difficult thing about the learning process. The work tends to curl, the stitches look uneven, and crocheting into your chain is no small feat. Even recognizing the stitches at first can be hard, leaving you with the task of ripping out your rows and trying again.

The piece of advice that got me started on my soon-to-be lovely bag came from my Mom. There is no rule that says that you need to do the chain or the first row onto it using the size of hook that the pattern dictates.

The pattern for my bag has asked me to use an 8.00mm size hook, which was a bit awkward for me, because I had practiced chaining and single crochet using a smaller hook.

In order to get the bag off the ground, I chained using the 8.00mm hook, but did my first row of single crochet using a 6.00mm hook. I also crocheted into the back loop, rather than both loops. Then, I continued the project using the 8.00mm hook and crocheting through both loops.

This allowed me to bypass some of the tightness, and helped me with the frustrating task of digging into a thin little chain with the monstrous hook!

Sunday, January 18, 2009

Beginner Tricks: The Hook, and Such


Being a beginner myself, I'm hardly in any spot to be giving tips to other would-be crocheters. Still, in the short time that I've been doing this, I've realized how personal the craft is, and so I'm going to document some of the tricks that have been working for me.

The Hook
My own research taught me that there are basically two ways to hold your crochet hook. The first is the Pencil Hold, which means that you hold it like you would a pencil. The flat part goes between your thumb and fingers, and the meat of it rests on your hand.

The second is the Knife Hold. This is the hold that I chose, because, and I quote, "I feel like I have a lot of control with this method and can really 'dig in'...It allows me to crochet faster than using the pencil hold." - Nancy Queen, The Chicks With Sticks Guide to Crochet.

Now that I've become used to it, I completely agree. Because you stitch into other stitches, you really are "digging." It did take me some time to get used to though. After all, I hold pencils more often than I hold knives.

The trick? You don't have to face the hook in any particular direction. You can aim it up, at you, down, or all around. This will not affect your yarn over. In fact, "yarn over" sounds more complicated than it is. 99% of the time, as long as you are hooking the yarn, you've yo'd.

Stringing the Yarn and Holding the Project
My other main problems involved holding the yarn. Everything was so tight, and I'd end up stretching my stitches trying to loosen the new ones and make room. Funnily enough, the problem rests almost entirely on what you're doing with your left hand (or right, if you're a leftie).

Why is it so tight? Because you're holding it tightly, silly! You just don't notice because you're paying attention to the hand with the hook. Once you've wrapped the yarn around your hand in a way that works for you, don't let it go. This is now a permanent condition until you have to put the entire piece down.

Remember that you have to shift the yarn a little through your hand. You also have to tug on the ball. Just move your entire left hand to pull a little yarn. If you're having trouble, check out your ball. If it is resting on the way it is wrapped, or caught on something, you might do well to turn it or move it entirely.

I like to keep it nestled between the back of my keyboard and my books, in the tote bag I carry, or in my lap with my legs crossed.

Trust me, treating your left hand (or whichever holds your yarn) as one solid unit did wonders for me.