Thursday, April 2, 2009

Second-Chance Afghan


The Second-Chance Afghan will be my first-ever blanket, and has a cute back story.

The yarn, which I eventually determined to be named "Country Print," was given to me by my mother, who originally purchased it with the intention to crochet an afghan as a wedding present for a good friend of mine. Unfortunately, a few rows in, she determined that it was intolerably ugly, and had to gift plan B.

Well, I went crying to her near the beginning of March, because I've been zipping through crochet projects so quickly that I had nothing to sink my hook into. This is how I inherited a very heavy bag of yarn and a Q-hook.

I vowed to try out different patterns until I found one that brought out the beauty of the yarn, and assumed that if I could not, there were charities that would appreciate it regardless.

Fortunately, it is actually working up rather nicely! I chose a pattern from a booklet, Leisure Arts #75029, Quick and Easy Q-Hook Afghans. The pattern is called Comforting, by Mary Ann Sipes, although I have modified it a bit, adding symmetrical rows of single crochet into the pattern.

This was for two reasons; 1) the pattern ideally calls for two colours of yarn and not one variegated, which meant that I was doing a lot of work for a heavily diminished effect, and 2) it lessons the time-spent and allows the pattern to pop.

The pattern is worked double-stranded, which I've never done before, and with a hook much larger than I've ever used, so it has been a wonderful learning experience and confidence booster.

Because of the colouring, which isn't looking too shabby, I may gift it to my Grandmother when I'm done, as it reminds me of her.

Tuesday, March 31, 2009

Turquoise Market Bag


According to my Ravelry project logs, which are so handy, I began this eco-friendly bag on February 19th and finished it February 23rd. This is a standard turn-around time for me, although I took a bit of a break in March. Time to catch up on the blogging!

This bag is made from one skein of Designer Sport in "Pool" or turquoise. It is an amazing busywork pattern, because the mesh portion requires only that you know how to chain and single crochet.

This is a pattern posted by Patons, and although I love the bag, I wouldn't use this pattern again. The handles were the biggest pain I could possibly devise, and so I cheated when I made mine. The top rim was also not entirely to my liking. However, it does expand extremely well; unstretched, it is actually quite tiny!

This bag would easily fit in pockets, purses, and the like, and should carry yarn, produce, books, and anything else you'd like to stick in it, provided it isn't too small!

It is also fully washable, and only cost me $2 to make. I have a list of other, similar patterns in my Ravelry faves, and I'll let you know how they go when I've gotten around to them. Maybe when I've experimented enough using cheap yarn, I'll be able to justify making some out of organic cotton!

Monday, March 30, 2009

April Goals

Hello folks! March has been extremely busy for me, but I hope to make more time for crocheting come April. Here are my goals:
  1. Work on the afghan I've started. Getting it halfway done would be marvelous.
  2. Finish the mystery gift I started - see my Pay it Forward post!
  3. Do all of the March goals that I didn't complete, which include finishing the Hippo, accessorizing the Heart, and catching up on my photography.
  4. Convert one of my failed fingerless gloves into a pouch.
While I didn't complete much in March, I did learn a lot. I spent all week planning and then baking a traditional Black Forest Cake for my father's birthday, and I spent some time working with my mother so that I will be able to finish the Hippo. I'd been having trouble with the snout, as the directions seemed unclear to me.

Friday, March 6, 2009

March Goals

  1. Finish my Hungry, Hungry Hippo!
  2. Add the accessories to my amigurumi heart.
  3. Photograph the Market Bag and my first bag, the Teal Project Bag.
  4. Learn something new.

Saturday, February 21, 2009

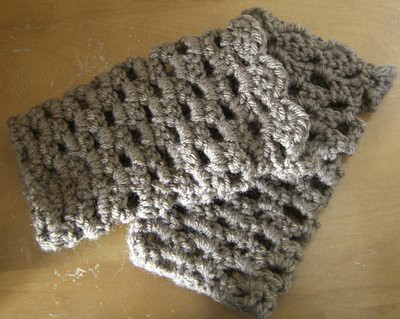
Openwork Fingerless Gloves in Taupe


I've been working through crochet patterns like an addict, and trying to keep up with the documentation!

One of the first patterns that I ever set my sights on was written by Creativeyarn, Crochet Openwork Handwarmers.

After another raid of my Mother's stash, I found two skeins of Vanna's Choice yarn in the correct weight in the colour, Taupe. I immediately snapped it up and went to work.

The first glove turned out rather well. I used a 4.00mm hook as suggested, but ran into a couple of problems. First of all, it felt a little snug, but I would have lived with it, assuming that it would stretch out, if not for the thumb hole. The hook size with my tension simply didn't leave a large enough opening, so the material was sitting off of my hand and pinching.

The other snag was the scalloped edging. The directions simply state:

Ch1, *5hdc in second dc of next dc group, sc in next space*. This gets repeated all the way around.

Having recently perused a pattern for yet another fingerless glove (I'm tireless, I know) recently, and had my Mother show me the beginning step, a double crochet foundation chain, I interpreted the directions in a similar manner.

I completed the hdc in the second dc, and then the next hdc in that one, and so on. While this "worked," it was difficult and inconsistent. I couldn't figure out how to insert the hook each time, so I just kind of forced it into wherever.

For the next two, I sat down with a book that I've borrowed from my local library and flipped through to the Shell or Fan stitch, wondering if this could be applied. Once I read it over, I knew it would do the trick. You make each stitch in the same stitch (in this case, the "second dc of the next dc group"), and then commonly pin it down on the other side with a single crochet. It ends up resembling the type of silk printed fan that I used to play with at my Granny's house as a child.

It worked beautifully! I also went up one full hook size, because I don't own a 4.50mm hook. They are quite roomy, and would fit someone more snugly with a larger hand size than I. Still, this will allow me to slip it over my watch and Medic Alert bracelet with ease. I could also slip it over a long-sleeved t-shirt and have the colour show through, rather than pushing up the sleeves.

I also have a keen idea of how to change the size of the glove to suit the wearer. For a pre-teen, I would use a 4.00mm hook. For an average sized, not overweight person, I'd use a 4.50mm, and for anyone larger, the 5.00mm hook.

As for the misfit glove, I plan on sewing the bottom end and lacing some ribbon around the top underneath the scalloped edging. If I need to add handles, I will. I haven't worked out all of the design details yet, but it will be a pouch or purse of some kind.

February Goals and Pay it Forward

February Goals
  1. Finish my first Market Bag. It's turquoise, eco-friendly, reusable, and so far, extremely fun to make!
  2. Finish my first Amigurumi project, Heart. Technically, I have already achieved this, but I need to add the embellishments yet.
  3. Decide how to embellish my felted bag, and then do it.
  4. Plan out the conversion of the two "failed" fingerless gloves into something useful and gorgeous.
  5. Finish blogging about the projects I've started, and finished, that you don't even know about yet!
My Pay it Forward Challenge
I was recently challenged to tag some friends in a handmade Pay it Forward Challenge. So far, I've had two responses, and am on the list of one other person. If you want in, just let me know!

Here are the rules:
What I make could be anything from a cd to a scarf to a cupcake to a Frankenstein doll, and it's my choice. You won't know what you get until you receive it!

You can give me hints about your favourite colours and interests, but I can't promise anything.

Your item will be unique and made by me with you in mind.

You need to tag someone else, or even me, but preferably about five people.

Friday, February 20, 2009

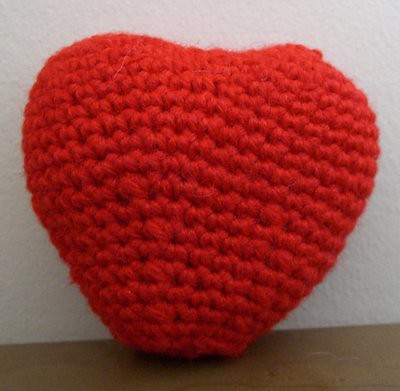
First Amigurumi: Hearts by Tamie Snow


A few weeks ago, I was surfing the boards on Ravelry when I came across an idea that was novel to me. Amigurumi, the art of knitting or crocheting stuffed animals and other such things, is open to beginners.

Excited, I asked for some suggestions, and finally settled on the pattern Hearts by Tamie Snow. It seemed simple, yet more appealing than crocheting a ball, and the fact that it lacks limbs and more complicated accessories drew me in. Of course, this was also a week before Valentine's Day, so I was in the mood.

The fact that I had free red yarn in my stash didn't hurt either!

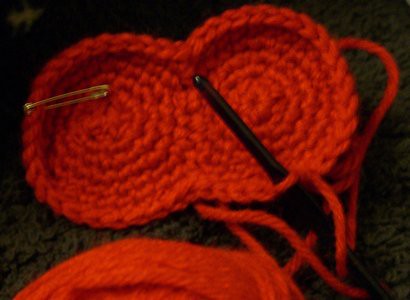
First, I had to teach myself the crochet version of the "magic adjustable loop technique," which is both easier and more difficult to master than my book suggested. Creating the loop and holding the yarn was super easy during the "difficult" first stage, and baffled me somewhat during the "easier" part where you actually begin to crochet.


A little bit of fiddling and some frogging over about a half hour period saw me making adjustable circles with ease. Whew!

This was also my first time working in the round, and more specifically, in a spiral. I didn't find this difficult, although eventually, counting my stitches and rows did become more difficult. I was being very cautious with the stitch markers, until I had to frog a row. How far do I frog back? Where was the beginning of the row before last? Not good. So, I improvised.

I also think that I was crocheting quite tightly, so I omitted two rows and closed up early, which did leave me with the correct measurements.

Unfortunately, I can't find my miscellaneous button stash and I am concerned that it isn't going to crop up any time soon. Because of this, the "finished product" is currently naked. Once I've done a little shopping, I'll post the final photo! Michael's was extremely disappointing for buttons, so I might have to check out Wal-Mart or better yet, Fabricland. Heck, I might even be able to convince Mom that she wants to take a trip to G&G.