Friday, May 8, 2009

My First Pattern: Coin Cuff


A few days ago, I found myself itching to crochet something. My mind has been elsewhere, so I hadn't really picked up the hook in a few weeks. Unfortunately, this also meant that, while my fingers were itching, I had no pre-planned projects.

There I sat, sifting through projects on Ravelry looking for something relaxing to crochet that could be done from stash, and I was having no luck.

Eventually, I decided upon something that was going to require some extra effort on my part. In my favorites bin sat a knitted cuff with a pocket to hold a few coins, perhaps subway tokens or bus money. I had intended to keep it so that when I teach myself to knit, I would be able to make it. I had found the finished object, and really liked the look of it. Check it out from dyedinthewool!

I also love how environmentally-friendly it is, especially if crocheted with organic, sustainable yarns.

I decided to recreate it through crochet, which meant creating a pattern from scratch.

I have to say that the process was quite interesting, and I strongly feel that I learned so much, and hopefully will be able to improve on the pattern, and make new ones in the future. Here are the things that I took into consideration before I started:
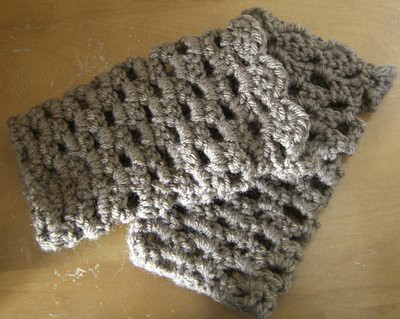
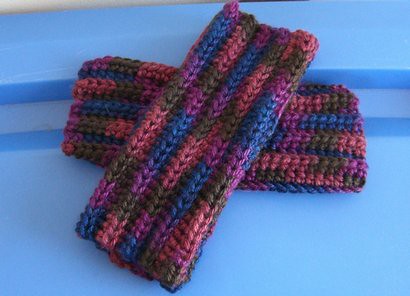
  • Colouration: I liked the rugged backpacking feel of the inspiration piece, and so I chose a grey. In the end, I couldn't help but crochet in some turquoise, which completely changed the feel of the piece. I think I need help!
  • Look: I wanted a ribbed, matte look, rather than the shiny, bulky look seen in the example given by the pattern author, Mazz. I have small hands, and I didn't want to overpower them.
  • Clasping: There had to be a way to close the pocket, and I debated between taking the opportunity to learn how to crochet a proper button hole, attaching snaps, or sewing on a button and crocheting a tie to go around it. I chose the tie method.
Crochet Pattern #1: Coin Cuff

Hook: 4mm
Yarn: Sport weight.

FO Measurements: 5.40cm tall x ~17cm around inside, post-stretch x 5mm thick. Pocket, 5.40cm across, 5cm down from top. Flap, 5.40cm across, 3cm down, measuring from point of origin.

Terms (US):

ch = chain
st = stitch
hdc = half double crochet
sc = single crochet
sl st = slip stitch
** = indicates a section to be repeated.

Cuff:
ch 33.
hdc in second ch from hook. hdc across, 32 st.
ch 1. turn. sc across, 32 st.

Repeat the following 3 times:
*ch 1, turn. hdc across, 32 st.
ch 1, turn. sc across, 32 st.*

Pocket:
At this point, decide if you would like a taller cuff. If so, repeat ** until satisfied. If not, continue:

ch 1, turn. sc in first 12 st.
sl st across 8 st.
sc across remaining 12 st. Finish off.

Looking at your 8-stitch-wide gap (top), locate the dashes ( - - - - ) that make up the ribbing effect, that correspond to these 8 stitches. They should be in the bottom rib.

Attach yarn, 2 if you are using a second colour, to the first or the 8th bottom rib stitch (either is fine). Make a knot, and leave a tail. You can either sew it in after, or sweep it into the pocket and cut the tail short.

sc across in 8 rib stitches.
ch 1, turn.

Repeat the following, 7 times, or until you reach the top rib, not edge:
*sc across in 8 rib stitches. ch 1, turn.* Finish off, leave a tail.

Flap:
Attach yarn (2) from one side of the 8 sts at the top.

sc across 8 sts, a few rows, to preference. I chose 5. Remember that some of the length is shortened as it folds over.

turn. ch 7, sl st into 8th stitch across. Note: the length of chain depends on your button size. Fasten off.

Sewing:
Sew your pocket on by going up each side. Determine button placement, and sew it on using the same yarn (thread will not be strong enough). I chose the type of button that has a big hoop on the back, rather than holes from front to back, as this leaves more room for the chain.

Sew the two ends of the cuff together, or run a quick row of sc across each, fasten off and sew in those ends, and then attach snaps. Of course, your cuff will need to be much longer than desired size if you choose this option.

Sew in all ends discretely.

Adjustments for different measurements:
Depending on your gauge, hook size, yarn, and wearer, you may want a tighter or looser fit. To do this, simply crochet more than 33 st in the beginning, or less. To adjust the pocket to fit in the centre, simply perform this simple calculation.

Determine a width based on the widest object it should hold. In my case, the diametre of a Canadian toonie. Use your stitches as the width.

Mine, to comfortably fit a toonie or three, is 8 stitches. Given the 32-stitch band, I expect to have 12 stitches on either side of the pocket. 8 + 12 + 12 = 32.

Thursday, April 2, 2009

Second-Chance Afghan


The Second-Chance Afghan will be my first-ever blanket, and has a cute back story.

The yarn, which I eventually determined to be named "Country Print," was given to me by my mother, who originally purchased it with the intention to crochet an afghan as a wedding present for a good friend of mine. Unfortunately, a few rows in, she determined that it was intolerably ugly, and had to gift plan B.

Well, I went crying to her near the beginning of March, because I've been zipping through crochet projects so quickly that I had nothing to sink my hook into. This is how I inherited a very heavy bag of yarn and a Q-hook.

I vowed to try out different patterns until I found one that brought out the beauty of the yarn, and assumed that if I could not, there were charities that would appreciate it regardless.

Fortunately, it is actually working up rather nicely! I chose a pattern from a booklet, Leisure Arts #75029, Quick and Easy Q-Hook Afghans. The pattern is called Comforting, by Mary Ann Sipes, although I have modified it a bit, adding symmetrical rows of single crochet into the pattern.

This was for two reasons; 1) the pattern ideally calls for two colours of yarn and not one variegated, which meant that I was doing a lot of work for a heavily diminished effect, and 2) it lessons the time-spent and allows the pattern to pop.

The pattern is worked double-stranded, which I've never done before, and with a hook much larger than I've ever used, so it has been a wonderful learning experience and confidence booster.

Because of the colouring, which isn't looking too shabby, I may gift it to my Grandmother when I'm done, as it reminds me of her.

Tuesday, March 31, 2009

Turquoise Market Bag


According to my Ravelry project logs, which are so handy, I began this eco-friendly bag on February 19th and finished it February 23rd. This is a standard turn-around time for me, although I took a bit of a break in March. Time to catch up on the blogging!

This bag is made from one skein of Designer Sport in "Pool" or turquoise. It is an amazing busywork pattern, because the mesh portion requires only that you know how to chain and single crochet.

This is a pattern posted by Patons, and although I love the bag, I wouldn't use this pattern again. The handles were the biggest pain I could possibly devise, and so I cheated when I made mine. The top rim was also not entirely to my liking. However, it does expand extremely well; unstretched, it is actually quite tiny!

This bag would easily fit in pockets, purses, and the like, and should carry yarn, produce, books, and anything else you'd like to stick in it, provided it isn't too small!

It is also fully washable, and only cost me $2 to make. I have a list of other, similar patterns in my Ravelry faves, and I'll let you know how they go when I've gotten around to them. Maybe when I've experimented enough using cheap yarn, I'll be able to justify making some out of organic cotton!

Monday, March 30, 2009

April Goals

Hello folks! March has been extremely busy for me, but I hope to make more time for crocheting come April. Here are my goals:
  1. Work on the afghan I've started. Getting it halfway done would be marvelous.
  2. Finish the mystery gift I started - see my Pay it Forward post!
  3. Do all of the March goals that I didn't complete, which include finishing the Hippo, accessorizing the Heart, and catching up on my photography.
  4. Convert one of my failed fingerless gloves into a pouch.
While I didn't complete much in March, I did learn a lot. I spent all week planning and then baking a traditional Black Forest Cake for my father's birthday, and I spent some time working with my mother so that I will be able to finish the Hippo. I'd been having trouble with the snout, as the directions seemed unclear to me.

Friday, March 6, 2009

March Goals

  1. Finish my Hungry, Hungry Hippo!
  2. Add the accessories to my amigurumi heart.
  3. Photograph the Market Bag and my first bag, the Teal Project Bag.
  4. Learn something new.

Saturday, February 21, 2009

Openwork Fingerless Gloves in Taupe


I've been working through crochet patterns like an addict, and trying to keep up with the documentation!

One of the first patterns that I ever set my sights on was written by Creativeyarn, Crochet Openwork Handwarmers.

After another raid of my Mother's stash, I found two skeins of Vanna's Choice yarn in the correct weight in the colour, Taupe. I immediately snapped it up and went to work.

The first glove turned out rather well. I used a 4.00mm hook as suggested, but ran into a couple of problems. First of all, it felt a little snug, but I would have lived with it, assuming that it would stretch out, if not for the thumb hole. The hook size with my tension simply didn't leave a large enough opening, so the material was sitting off of my hand and pinching.

The other snag was the scalloped edging. The directions simply state:

Ch1, *5hdc in second dc of next dc group, sc in next space*. This gets repeated all the way around.

Having recently perused a pattern for yet another fingerless glove (I'm tireless, I know) recently, and had my Mother show me the beginning step, a double crochet foundation chain, I interpreted the directions in a similar manner.

I completed the hdc in the second dc, and then the next hdc in that one, and so on. While this "worked," it was difficult and inconsistent. I couldn't figure out how to insert the hook each time, so I just kind of forced it into wherever.

For the next two, I sat down with a book that I've borrowed from my local library and flipped through to the Shell or Fan stitch, wondering if this could be applied. Once I read it over, I knew it would do the trick. You make each stitch in the same stitch (in this case, the "second dc of the next dc group"), and then commonly pin it down on the other side with a single crochet. It ends up resembling the type of silk printed fan that I used to play with at my Granny's house as a child.

It worked beautifully! I also went up one full hook size, because I don't own a 4.50mm hook. They are quite roomy, and would fit someone more snugly with a larger hand size than I. Still, this will allow me to slip it over my watch and Medic Alert bracelet with ease. I could also slip it over a long-sleeved t-shirt and have the colour show through, rather than pushing up the sleeves.

I also have a keen idea of how to change the size of the glove to suit the wearer. For a pre-teen, I would use a 4.00mm hook. For an average sized, not overweight person, I'd use a 4.50mm, and for anyone larger, the 5.00mm hook.

As for the misfit glove, I plan on sewing the bottom end and lacing some ribbon around the top underneath the scalloped edging. If I need to add handles, I will. I haven't worked out all of the design details yet, but it will be a pouch or purse of some kind.

February Goals and Pay it Forward

February Goals
  1. Finish my first Market Bag. It's turquoise, eco-friendly, reusable, and so far, extremely fun to make!
  2. Finish my first Amigurumi project, Heart. Technically, I have already achieved this, but I need to add the embellishments yet.
  3. Decide how to embellish my felted bag, and then do it.
  4. Plan out the conversion of the two "failed" fingerless gloves into something useful and gorgeous.
  5. Finish blogging about the projects I've started, and finished, that you don't even know about yet!
My Pay it Forward Challenge
I was recently challenged to tag some friends in a handmade Pay it Forward Challenge. So far, I've had two responses, and am on the list of one other person. If you want in, just let me know!

Here are the rules:
What I make could be anything from a cd to a scarf to a cupcake to a Frankenstein doll, and it's my choice. You won't know what you get until you receive it!

You can give me hints about your favourite colours and interests, but I can't promise anything.

Your item will be unique and made by me with you in mind.

You need to tag someone else, or even me, but preferably about five people.

Friday, February 20, 2009

First Amigurumi: Hearts by Tamie Snow


A few weeks ago, I was surfing the boards on Ravelry when I came across an idea that was novel to me. Amigurumi, the art of knitting or crocheting stuffed animals and other such things, is open to beginners.

Excited, I asked for some suggestions, and finally settled on the pattern Hearts by Tamie Snow. It seemed simple, yet more appealing than crocheting a ball, and the fact that it lacks limbs and more complicated accessories drew me in. Of course, this was also a week before Valentine's Day, so I was in the mood.

The fact that I had free red yarn in my stash didn't hurt either!

First, I had to teach myself the crochet version of the "magic adjustable loop technique," which is both easier and more difficult to master than my book suggested. Creating the loop and holding the yarn was super easy during the "difficult" first stage, and baffled me somewhat during the "easier" part where you actually begin to crochet.


A little bit of fiddling and some frogging over about a half hour period saw me making adjustable circles with ease. Whew!

This was also my first time working in the round, and more specifically, in a spiral. I didn't find this difficult, although eventually, counting my stitches and rows did become more difficult. I was being very cautious with the stitch markers, until I had to frog a row. How far do I frog back? Where was the beginning of the row before last? Not good. So, I improvised.

I also think that I was crocheting quite tightly, so I omitted two rows and closed up early, which did leave me with the correct measurements.

Unfortunately, I can't find my miscellaneous button stash and I am concerned that it isn't going to crop up any time soon. Because of this, the "finished product" is currently naked. Once I've done a little shopping, I'll post the final photo! Michael's was extremely disappointing for buttons, so I might have to check out Wal-Mart or better yet, Fabricland. Heck, I might even be able to convince Mom that she wants to take a trip to G&G.

Sunday, February 15, 2009

Fingerless Gloves: Second Time is a Charm!


Forget the third time, I beat the Fingerless blues on the second try. Here is how I achieved success:
  1. I spent forever getting the foundation chain to actually be as wide as the measurements in the pattern dictated, without having to add stitches. Well, I did this on the second glove. The first one is a little homelier. (Okay, okay, so maybe third time IS the charm)
  2. I chose a thinner yarn. I still didn't want to work with the mohair, and am having fun pulling out of my stash. This was completed using Bernat Satin Ombres, and the colour, as best I can tell, is "Tapestry." In my opinion, that's sort of like saying "sofa" is a colour, but I'll run with it.
  3. I used the correct hook size. I know this sounds obvious, but I hadn't been able to get the foundation chain to the length that I wanted on my first and failed attempt, so I had gone up several hook sizes.
  4. When sewing up the seams, I left an extra half inch for the thumb hole.

Friday, February 13, 2009

A Failed Experiment


I should have seen this coming. My first crochet project was such a smashing hit that my second would have to be a bit of a bumpy road. Either that, or I got cocky.

I chose a simple pattern worked in half-double crochet through back loops only. "Purple Haze Fingerless Gloves" can be found in the book, The Chicks With Sticks Guide to Crochet by Nancy Queen and Mary Ellen O'Connell.

After glorious nights of sitting quietly and hooking endless rows of stitches for my project bag, I really wanted something to do. So, despite the fact that I didn't have the right type of yarn, I forged ahead.

I chose a gorgeous Peacock Blue from Lion Brand. I believe it was a Jiffy Solid. It is quite fuzzy, and thick, and I ended up having to improvise along the way.

As I mentioned when I began the project, the measurements really didn't pan out. The following are my notes on why this is fine and dandy and what I learned from the whole process.

First of all, I learned that I should probably be more trusting of the pattern. The designers probably know a little bit more about measurement than I do. After all, mine ended up a full six inches wider around than they should have. This is my cue to whistle innocently.

After making this glove, I learned, finally, how to make a chain that even remotely resembles the proper gauge.

This is important because, if my foundation chain is three inches too tight, and I measure it to go around my wrist un-stretched, when I load up the full and fluffy stitches on top, the measurements end up a little off. Just a tad.

Unfortunately, making such a chain still seems to take me the better part of an hour. I have to fiddle a lot to make it big and loose enough, without leaving weird open loops, losing my ability to "see" the stitch, or oddly enough, gaining and losing stitches. It is not fun, but in the end, it is worth it.

So what will I do with this cute glove? I'm thinking of sewing up the thumb hole and either or both ends. It could be a small bag or wallet, perhaps. I'm taking suggestions!

Saturday, February 7, 2009

The Ring Has Arrived


I'm afraid that I can't take a picture of this ring that does it justice. Suffice it to say that it and I are now inseparable.

To let you know what I've been up to, here is a list of upcoming goodies:
The above Golden Topaz ring was created by Tammy Riddle at Hand Sculpted Jewelry.

Saturday, January 31, 2009

Love Affair with Crochet

Breibeest on flickr, for her goddaughter.

I fell asleep last night pondering the things that I am loving about my new hobby, crochet. Oddly enough, I did not have crochet-related dreams. This morning's Dream Journal Entry was quite hilarious actually, involving Obama, a pot of giant jelly beans, my elderly Grandmother looking oddly pregnant, a lengthy discussion on the construction of bunk beds, and some bear figurines.

Back to the topic, I have been trying to spend more time thinking about positive things, and try to think about the highlights of my day when I'm trying to drift off.

I waited until this year to take up a craft like crochet for several reasons, despite the fact that my Mother could have taught me long ago. From afar, it looks frustrating, or even boring, and as my Dad says, you'd think you'd make a few rows and think "okay, I did it, I'm done."

In actuality, there is a lot to love. The feel of the yarn wrapped around your hand, the feel of the project, and even just squeezing the skeins in the store, touches something deep inside. Like the beginning of a lifelong feeling that will grow over time. I've known some people who feel the same about wood and tools.

I enjoy the idea of taking shapeless "string" and creating something with shape, structure, and beauty. Functionality is good too, I suppose.

I was never one of those girls who liked to blog about the contents of her purse, although I do carry one with me constantly. Now that I seem to have this bag containing all of these little useful tools and such, I'm starting to identify.

For some reason, the box of yarn in my bedroom that is hiding from the cats is a comfort. It will always be there for me, if I feel like being fidgety.

I love to stare at my stitches.

Things are now available in turquoise, if I have some time to make them!

I feel like I have something in common now with almost every woman in my family, dating back across the years, as well as so many people around the world.

Friday, January 30, 2009

Crochet Project Two: Fingerless Gloves


Tonight, I am looking forward to some much-needed downtime. I'm hoping to finish up the second panel of my January bag, as I've taken to calling it. I doubt I'll have time to attach the panels to each other tonight, but maybe by the end of the weekend.

Last night, I wanted to crochet so badly, but it was after 11:00 p.m. before I had the time, which ruled out working on the bag. Because I did not count my rows, and varied from the pattern some, I will need a block of time to wrap up the panel, matching it to the first.

I decided to snag some yarn from my stash and try my hand at the third pattern in the book I've been reading, The Chicks With Sticks Guide to Crochet, for a pair of fingerless gloves.

My love of such gloves knows no bounds.

Because I did not have the right type of yarn, I ended up doing and redoing my foundation chain so many times that I finally settled on a size 9.00mm hook (rather than the 5.00mm recommended).

I have to say, half double crochet is much harder than single crochet. Or rather, it is more awkward. You actually yarn over before you dip into the stitch, and I find myself using my left index finger to keep the yarn from slipping off before I make that move.

I also have some sneaking suspicions that I occasionally revert to sc, or some interesting variation thereof, although I'm not certain. The stitches aren't as pretty as the ones on my bag, but the yarn seems to be a bit fuzzier anyway, so once I've worn them a few times, no one should notice. Besides, that's what first projects are for, right?

My main worry is the measurement. I've been doing 27 stitches across, and it seems like it will be a perfectly loose fit before they ever stretch out. I'll totally rock 'em though.

Tuesday, January 27, 2009

HSJ Giveaway


There's nothing I love more than a good giveaway, so when I heard that Hand Sculpted Jewelry is sponsoring one this week, I knew I had to post about it.

If you don't remember, this is the shop from which I purchased that gorgeous Golden Topaz handmade ring!

Now, Tammy is giving away a beautiful French Scroll Bangle Bracelet via Cafe Handmade. You have the whole week to enter. She also currently has a booth at Cafe Handmade's Virtual Craft Show, which includes a similar bracelet to that being given away, with gold tones worked into it.

Why are you still here? Enter already!

Sunday, January 25, 2009

Hand Sculpted Jewelry


Last night, I made my second Etsy purchase, and I cannot wait until it arrives! Just like the beautiful fingerless gloves that we ordered for my birthday, I wanted something equally special and unique for Valentine's Day. It is very important to me to support the handmade community.

Let me tell you, the wonderful artisans at Etsy do not make it easy to choose just one gift. After much deliberation, I narrowed it down to one shop: Hand Sculpted Jewelry.

I felt an instant connection with the artist, Tammy's, rings, and two in particular stood out. The above photo of the Golden Topaz ring is the one that I selected in the end.

It might seem an odd choice, given that this isn't my birthstone. To that I say, I am a liberated being, and I can choose whichever stone speaks to me! The yellow just popped. It's such a happy ring. These days, yellow seems to be my new spirit-lifting colour of choice.

I'm grateful that I have met Tammy, the artist. She's just delightful, and very accommodating. All of her pieces are unique, and she'll work with you to create a custom size and colour scheme if you're looking for something in particular.

She also happens to have a Valentine's sale going on. It lasts from now until the 14th of February, Valentine's Day itself. A $50 purchase will net you free shipping, $75 will grant you a $10 gift certificate, and $100 gets you a $20 gift certificate.

She even throws in a complimentary gift box, and you only pay the cost of shipping one item, even if you purchase multiples. Again, I cannot wait until my ring arrives!

Tuesday, January 20, 2009

Panel One, Done


Ahh, the sweet sensation of success. Last night, I parked myself down in front of my television set for a few hours and finished off the first panel of my bag. I haven't sewn in any of the ends yet, but it looks gorgeous.

Of course, this means that I still have one full panel to go. My measurements are a bit off, at 13.4 inches across and 19.6 tall, off from 14 inches by 19. This is mainly due to one dropped stitch at the beginning, and my inability to count rows. Replicating it should be easy enough though.

I did run into some trouble shaping the handle. Because this is my first time reading a pattern, and I've been doing it alone, I made one mistake when beginning the shaping. Instead of attaching a second ball, as is recommended, I decided to use only one, and simply cut it off when I was done the first side.

This would have gone fine, if not for one small oversight on my part. You work toward the middle, back, toward the middle, and back, and so on. Ideally, I would have done this for one side, cut it off at the corner of the panel, repeated this for the other side, and then beginning at that corner, made one more row, chained 13, and then continued on the one side.

Alas, I ended up having to cut and attach the ball of yarn three or four times because I ended the row in the middle rather than the corner, which would have resulted in one handle having one more row than the other! Oh well, that was easy enough.

The chaining didn't go as well. I thank my lucky stars that when I crocheted back over it, I did not drop a stitch, because each was very difficult to determine, and nearly impossible to shove my hook into, despite my best efforts to make a loose chain. Simply crocheting over that 13-chain probably took me well over half an hour. Now, to repeat the process!

In other news, I finally got my ravelry invitation today! I've spent all afternoon cataloguing my yarn, hooks, this project in-progress, adding the pattern to the database, joining groups, and much more! Find me as starlitafternoon.

Monday, January 19, 2009

Tips for Starting a Project


I have to say that so far, starting up a crochet project has been the most difficult thing about the learning process. The work tends to curl, the stitches look uneven, and crocheting into your chain is no small feat. Even recognizing the stitches at first can be hard, leaving you with the task of ripping out your rows and trying again.

The piece of advice that got me started on my soon-to-be lovely bag came from my Mom. There is no rule that says that you need to do the chain or the first row onto it using the size of hook that the pattern dictates.

The pattern for my bag has asked me to use an 8.00mm size hook, which was a bit awkward for me, because I had practiced chaining and single crochet using a smaller hook.

In order to get the bag off the ground, I chained using the 8.00mm hook, but did my first row of single crochet using a 6.00mm hook. I also crocheted into the back loop, rather than both loops. Then, I continued the project using the 8.00mm hook and crocheting through both loops.

This allowed me to bypass some of the tightness, and helped me with the frustrating task of digging into a thin little chain with the monstrous hook!

Sunday, January 18, 2009

Beginner Tricks: The Hook, and Such


Being a beginner myself, I'm hardly in any spot to be giving tips to other would-be crocheters. Still, in the short time that I've been doing this, I've realized how personal the craft is, and so I'm going to document some of the tricks that have been working for me.

The Hook
My own research taught me that there are basically two ways to hold your crochet hook. The first is the Pencil Hold, which means that you hold it like you would a pencil. The flat part goes between your thumb and fingers, and the meat of it rests on your hand.

The second is the Knife Hold. This is the hold that I chose, because, and I quote, "I feel like I have a lot of control with this method and can really 'dig in'...It allows me to crochet faster than using the pencil hold." - Nancy Queen, The Chicks With Sticks Guide to Crochet.

Now that I've become used to it, I completely agree. Because you stitch into other stitches, you really are "digging." It did take me some time to get used to though. After all, I hold pencils more often than I hold knives.

The trick? You don't have to face the hook in any particular direction. You can aim it up, at you, down, or all around. This will not affect your yarn over. In fact, "yarn over" sounds more complicated than it is. 99% of the time, as long as you are hooking the yarn, you've yo'd.

Stringing the Yarn and Holding the Project
My other main problems involved holding the yarn. Everything was so tight, and I'd end up stretching my stitches trying to loosen the new ones and make room. Funnily enough, the problem rests almost entirely on what you're doing with your left hand (or right, if you're a leftie).

Why is it so tight? Because you're holding it tightly, silly! You just don't notice because you're paying attention to the hand with the hook. Once you've wrapped the yarn around your hand in a way that works for you, don't let it go. This is now a permanent condition until you have to put the entire piece down.

Remember that you have to shift the yarn a little through your hand. You also have to tug on the ball. Just move your entire left hand to pull a little yarn. If you're having trouble, check out your ball. If it is resting on the way it is wrapped, or caught on something, you might do well to turn it or move it entirely.

I like to keep it nestled between the back of my keyboard and my books, in the tote bag I carry, or in my lap with my legs crossed.

Trust me, treating your left hand (or whichever holds your yarn) as one solid unit did wonders for me.

Thursday, January 15, 2009

Amazing Fingerless Gloves


Yesterday, my birthday present from Sam finally arrived! I had asked for some fingerless gloves, and I had my eye on a few listed on etsy.com. After some thought, I chose this pair from Lola and Emilin.

The gorgeous turquoise section comes from a sweater that happened to make its way into the dryer one fine day. I love that element, as well as the pairing of the grey crocheted hand pieces.

They're very warm, and allow for a lot of movement. I can even slip them on over a watch or my Medic Alert bracelet in a pinch if I'm cold.

They came thoughtfully packaged, and included two free handmade gift tags with owl imprints. I'm so happy with this purchase. I can't wait until I'm able to crochet my own gloves, although it will be quite some time before I'm able to do anything close to this.

Wednesday, January 14, 2009

My First Crochet Project

This is a snapshot of my first work in progress. Soon, this will be a gorgeous felted bag in my fave colour, teal.

The pattern can be found on page 33 of The Chicks with Sticks Guide to Crochet by Nancy Queen and Mary Ellen O'Connell, and is entitled, "Chicks' Slit-Top Felted Bag."

I have chosen Lion Brand 100% wool that is "perfect for felting." The weight is medium (four), and the colour is "Dark Teal." I was so pleased when my Mom found a stack of it on sale, because teal and turquoise are my favourite colours.

Because this will be my first project, I wasn't going to spend too much money on it. I kept joking that I'll be walking around with a homely little craft bag as my badge of honour as a beginner.

I've actually spent some time playing around with chaining and the single crochet, although my first "piece" was just a chain with a few rows on top of it using some leftover acrylic yarn from my Mother's stash. It looked all right, although I later found out that I was doing it, well, not wrong, but I was crocheting into the back (?) loop only, rather than through both.

I also had a habit of losing stitches.

After some extremely unsuccessful attempts at playing around with the 8.00mm hook that I am using for this project, I thought, why not just start? It'll sort itself out.

I'm so pleased that I did! My stitches are prettier than I could have imagined, and I feel like a pro. All of the things that I had been practicing that hadn't quite clicked yet, such as stringing the yarn along through my left hand, just fell into place. I can't wait to get more of it done.

I am also finding myself quite addicted already! I'm anxious to start connecting with other crocheters, and developing my skills so that I can try different patterns. First, of course, I have to finish this bag!